1. Introduction to the Employee Web Interface (EWI)
The Employee Web Interface (EWI) is a tool designed for employees working with the "Project Control" functionality, enabling effective task management, time tracking, and productivity analysis.
EWI helps employees:
- Track time spent on tasks.
- Manage their time through an intuitive interface.
- Work with tasks using a visual Kanban board.
This interface is intended for daily use by employees who actively engage with projects and tasks within the Kickidler project control system.
2. How to Access EWI
To access the Employee Web Interface, follow these steps:
Step 1: Transition from the Self-Control Interface (SCI)
- Open the Self-Control Interface (SCI).
- Click on the "My Tasks" button:
- This button is located at the top of the interface.
- Clicking it will open a mini-version of the interface with available tasks.
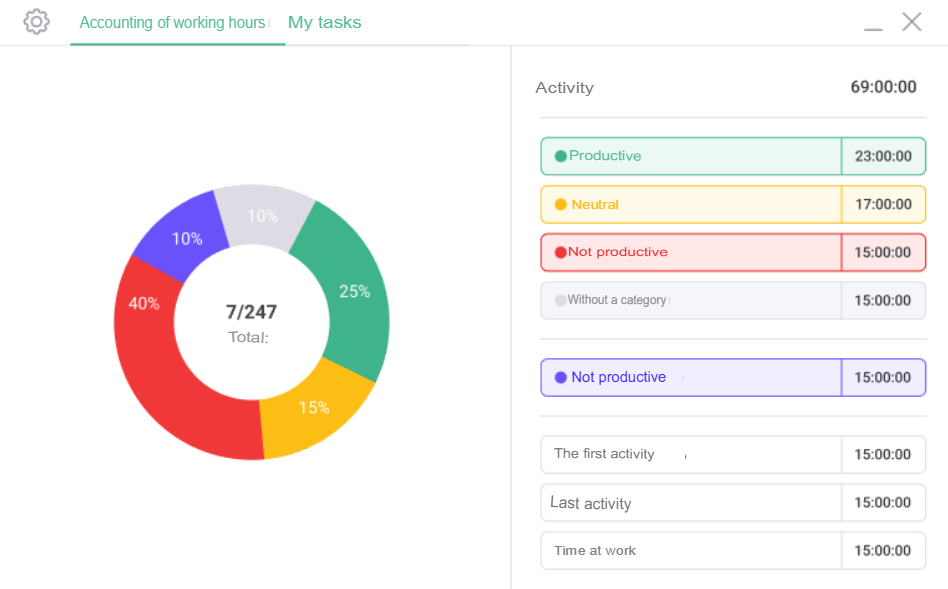
Step 2: Transition to EWI
In the opened mini-interface, click on the "All Tasks" button.
- The button is usually located at the bottom of the mini-interface.
- You will be automatically redirected to the Employee Web Interface (EWI).

3. How to Start Tasks from SCI
Employees can start tasks directly from the Self-Control Interface (SCI). Follow these steps:
Step 1: Navigate to "My Tasks"
- Open the Self-Control Interface (SCI).
- Click on the "My Tasks" button.
Step 2: Select a Task
- In the opened mini-interface, select the task you want to start.
- Click on the task to open its details.

Step 3: Start the Task
- Click the "Start" button located next to the selected task.
- The system will begin tracking the time spent on the task.

4. How to Grant Access to EWI for Employees
To make the Employee Web Interface (EWI) available to an employee, the settings on the Central Server must be configured.
Step 1: Log into the Central Server Settings
- Log into the Central Server using an administrator account.
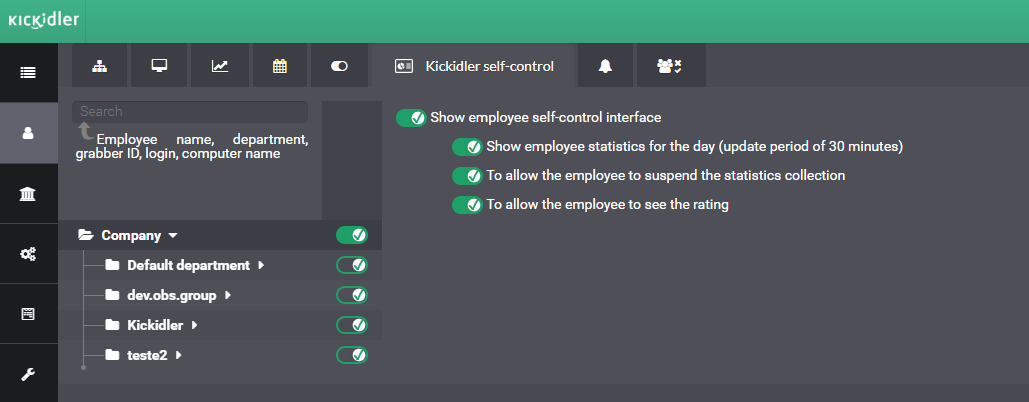
- Go to the "Kickidler Self-Control" section.
Step 2: Enable Access to the Interface
- In the settings, find the option "Show self-control interface to the employee."
- Ensure that the option is enabled (a green checkmark should appear on the checkbox).
- When this setting is enabled, the employee will have access to the "Self-Control" interface and the ability to
- transition to EWI.
"My Tasks" Section
1. General Description of the "My Tasks" Section
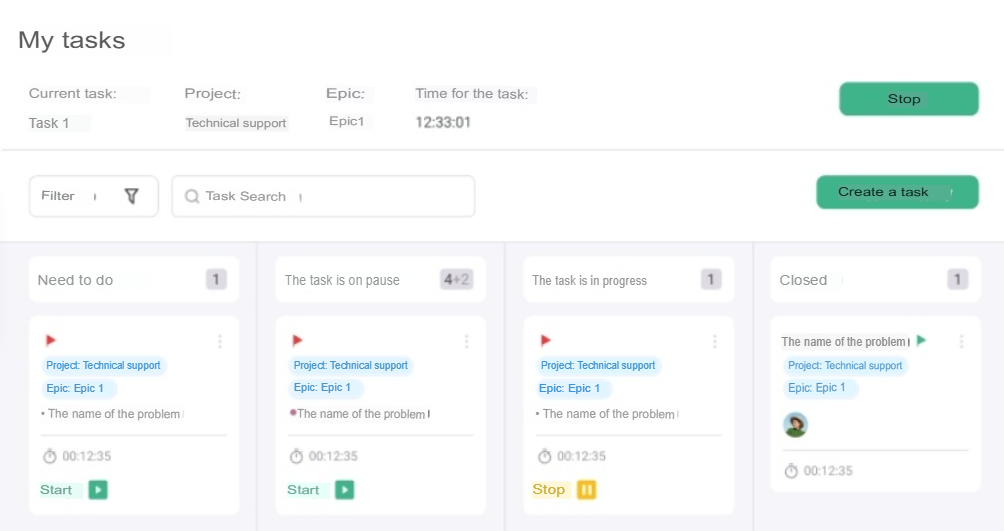
The "My Tasks" section of the Self-Control Web Interface (SCI) provides employees with a convenient tool for task management. The main interface is represented as a Kanban board, which allows employees to monitor current tasks, switch between statuses, and track the time spent on each task.
2. Structure of the "My Tasks" Interface
2.1 Top Control Panel
The top part of the page contains key information about the current task and functional elements:
Information for the selected task
- Current task: The name of the task the employee is working on.
- Project: The name of the project to which the task is linked.
- Time on task: The total time spent on completing the task.

Button "Start/Stop"
Start or stop the timer for a task.
- The "Start" button is used to begin working on the task.
- The "Stop" button ends the active timer.
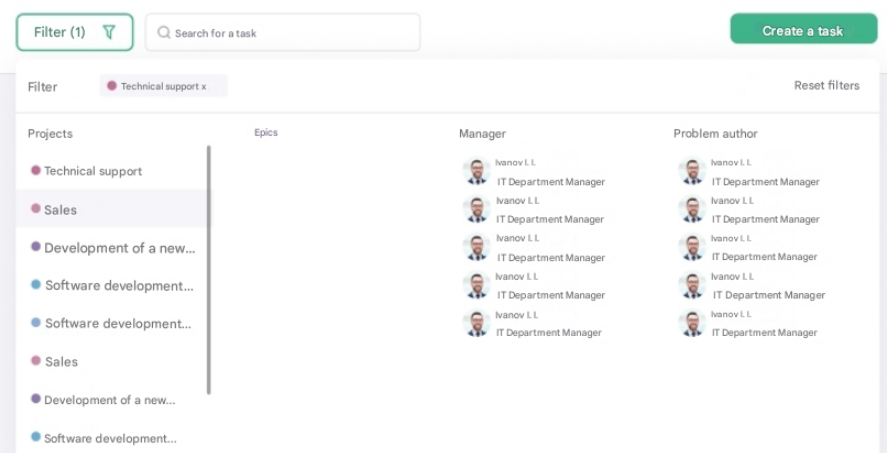
Task Filters
The filter system helps quickly find the desired task on the Kanban board:
- Filter by project: Displays tasks of a specific project.
- Filter by epic: Narrows the task list by a specific epic.
- Filter by manager: Shows tasks assigned to a specific manager.
- Filter by task novelty: Three sorting modes:
- New first
- Old first
- By deadline
Task Search Bar
Used to quickly search for tasks by keywords (e.g., by task name).

Button "Create Task"
Allows adding a new task.

2.2 Kanban Board
The main part of the page is represented by the Kanban board, which is divided into four columns:
- To Do: Tasks waiting to be completed.
- Tasks on Pause: Tasks temporarily suspended.
- Task in Progress: Active tasks that the employee is currently working on.
- Closed: Completed tasks.

3. Task Information
- Each task card displays the following information:
- Task name: The brief name of the current task.
- Epic name: If the task is part of an epic, the epic name will be shown.
- Time spent on the task: The total time spent on completing the task.
- Button "Start/Stop": Time management for the task.
- Start begins the timer for the selected task.
- Stop ends the timer.
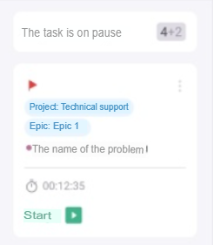
4. Task Actions
- Starting a Task
- Click the "Start" button next to the task to begin working on it.
- The timer will start, and the task will automatically move to the "Task in Progress" column.
- Pausing a Task
- If you need to temporarily stop working on a task, click the "Stop" button.
- The task will move to the "Tasks on Pause" column.
- Completing a Task
- Once the task is fully completed, click "Stop" and move the task to the "Closed" column.
- Task Filtering
- Use the top filters to quickly display tasks by project, epic, manager, or deadline.
- Searching for a Task
- Enter a keyword in the search bar to find a specific task.
- Creating a New Task
- Click the "Create Task" button.
- In the opened window, fill in the necessary fields (task name, project, epic, deadline, etc.).
5. Additional Interface Features
Task Sorting
Choose the order in which tasks are displayed using the dropdown menu:
- New tasks first
- Old tasks first
- By deadline
Kanban Board Interactivity
You can drag tasks between columns to change their status:
- From "To Do" to "Task in Progress".
- From "Tasks on Pause" back to "In Progress" or "Closed".
Task Creation Description in the "My Tasks" Section
The "My Tasks" section allows managing tasks using an intuitive interface. By clicking the "Create Task" button, a special window opens for entering the new task's parameters. This window enables configuring the task to link it to a project, epic, and set all the necessary parameters.
Task Creation Interface Elements
- Task Name
- Description: Field for entering a unique task name.
- Requirement: The name should be brief but informative.
- Example: "Sales Report Creation."
- Project Name
- Description: A dropdown list with projects where the user can create tasks.
- Features:
- The task must be linked to a project.
- If no project is selected, the system will issue a warning.
- Example: "Technical Support."
- Epic Name
- Description: Field to select the epic the task will be included in.
- Features:
- If the project contains epics, the task must be linked to one of them.
- If no epic is selected, the system may display a message prompting the user to specify an epic.
- Example: "Epic 1."
- Task Type
Options: Example: "With Deadline" selected.- No Deadline: Selected if the task has no time constraints.
- With Deadline: Allows specifying a completion date.
- Deadline
- Description: Field for selecting the date by which the task should be completed.
- Features:
- Available only when the task type "With Deadline" is selected.
- If a deadline is chosen but conflicts with the project deadlines, the system will alert the user.
- Example: "23.05.2023."
- Priority
- Description: Indicates the importance of the task.
- Options:
- High
- Medium
- Low
- Example: "Medium" priority selected.
- Task Status
- Options:
- To Do: Task has not started yet.
- In Progress: Task is being worked on.
- Features: The status can be changed later by moving the task across the Kanban board.
- Example: "To Do" status selected.
- Options:
- Color Label
- Description: Option to select a color for visually highlighting the task.
- Features:
- Helps quickly identify tasks on the Kanban board.
- A wide variety of colors is available.
- Example: "Blue" color selected.
- Description
- Description: Text field for entering additional task information.
- Features: This field is optional but helps in task detailing.
- Example: "Prepare statistical report using data from the last quarter."
Interface Buttons
- Create
- Description: Completes the task creation process.
- Features: If mandatory fields are not filled, the system will show an error message.
- Result: The task is added to the "To Do" column on the Kanban board.
- Cancel
- Description: Cancels the task creation process.
- Result: The user is returned to the "My Tasks" section without saving any changes.
"Self-Control" Section
1. General Description of the Section
The "Self-Control" section of the Self-Control Web Interface (SCI) provides the employee with a visual representation of their working time, completed tasks, and activity on websites and in programs. The interface is divided into three main parts, allowing for a detailed analysis of the workday and the ability to make adjustments.
2. Structure of the "Self-Control" Interface
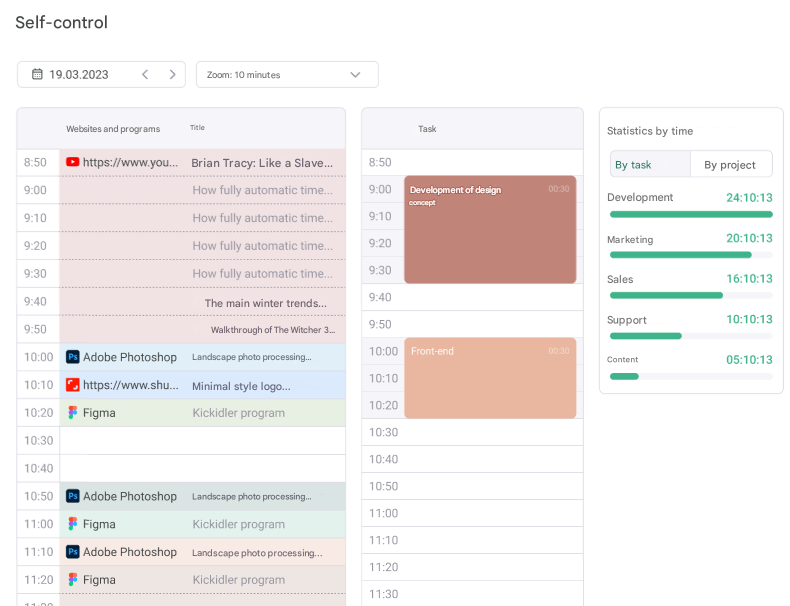
2.1 Main Interface Components
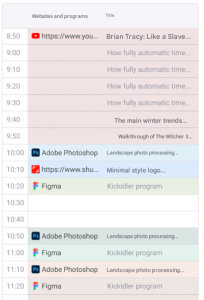
- Timeline with Websites and Programs (Left Column)
This column displays the employee's activity over time:- Websites and Programs: The names of the programs and websites used are shown.
- Titles: The titles of active windows or pages.
- The timeline is vertical and divided into intervals.
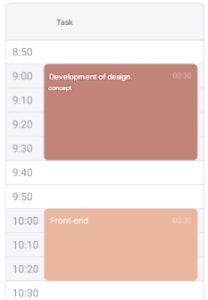
- Timeline with Tasks (Central Column)
Here, tasks that were completed or scheduled are displayed.- Add Task: Clicking on free time opens a window for adding a task.
- Edit Task: Tasks can be stretched across time to increase their duration.
- Drag and Drop Task: Tasks can be moved across the timeline to change their execution time.
- Delete Task: Option to cancel an added task.
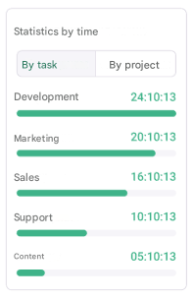
- Summary Statistics (Right Column)
Allows analyzing total time spent on projects and tasks:- By Task: How much time was spent on each specific task.
- By Project: Total time spent on tasks within a single project.
- Visually represented as lists with progress bars and timers.
2.2 Additional Filters and Settings
Date Filter
- Allows selecting a specific day to view activities and tasks.
- Use the left and right arrows to navigate between days.
Zoom Level Filter
Allows adjusting the zoom of the timeline for more detailed task viewing:
For example, you can set the zoom to 10 minutes for more precise task adjustments.

3. Working with the Task Timeline
3.1 Adding a Task
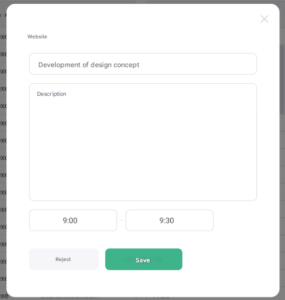
- Click on the free space in the task timeline (central column).
- A task addition window will appear, where you need to specify:
- Task name
- Task description (optional)
- Start and end time of the task
- After filling in the details, click the "Save" button.
- The task will appear on the timeline.
3.2 Editing a Task
- Select the task on the timeline.
- Drag the task's boundaries to increase or decrease its duration.
- To change the task's position, drag it to a different time slot.
3.3 Moving Tasks
- Tasks can be dragged and dropped between different time intervals.
- This allows for quick adjustments to the day's schedule based on priorities.
4. Time Statistics
4.1 Viewing Statistics
The right column presents summarized information about working time:
- By Task: The time spent on each task is displayed.
- By Project: The total time spent on tasks within each project is displayed.
4.2 Interpreting the Data
- Progress bars help visually assess which projects or tasks took more time.
- Exact time (hours:minutes) allows for detailed tracking of productivity.
5. Important Buttons and Interface Elements
| Date Filter | Allows selecting a specific day to view activity and tasks. |
| Zoom Filter | Adjusts the zoom level of the timeline (e.g., 10-minute intervals). |
| Add Task | Clicking on free space in the timeline opens the task addition window. |
| Save | Saves the new or edited task. |
| Cancel | Cancels task creation or editing. |
| Drag and Drop Task | Allows moving the task to a different time slot. |
 English
 Русский
 Português
 Español
 Հայերենով
 Türkçe
 Български
 中文
中文 ქართული
 Français

