In the “History” section you can view historical recordings from the displays of the employee for any period of time. You can switch to the section either by clicking the “History” button of control panel or from employee analysis interface. All data from the “History” section is saved on the HDD. In other words, if the information for the whole session or for the selected period is deleted from the Server, or the Server is unavailable for some reason - video will exist and can be played.
Working with Video
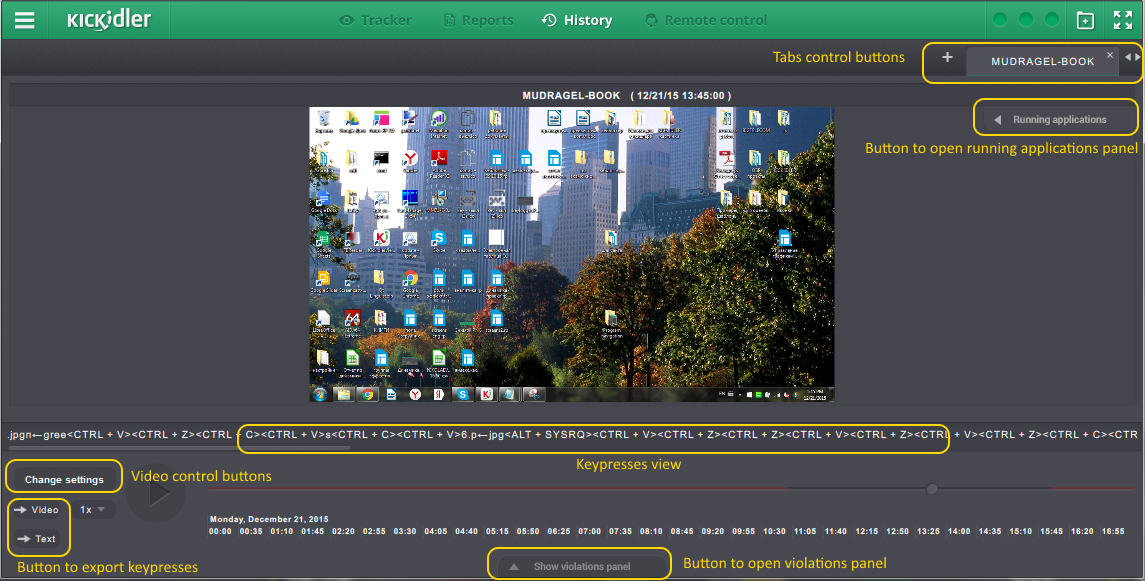
Interface for watching video looks like common video player. You can play/pause video by pressing the buttons ![]() ,
, ![]() or rewind to interesting moment of time by scrolling slider
or rewind to interesting moment of time by scrolling slider ![]() . If employee has several displays, recordings will be played simultaneously in a single interface.
. If employee has several displays, recordings will be played simultaneously in a single interface.
For easy viewing you can create tabs in section. Tabs management works as described in Quadrator. When adding new tab, the window will appear where you need to type parameters for video request. Downloading video from server for large amount of time will require some time. New tab has the name that matches employee’s name whose display recording are displayed in the tab.
Display video recording has following parameters:
- employee,
- video period,
- step,
- speed of video.
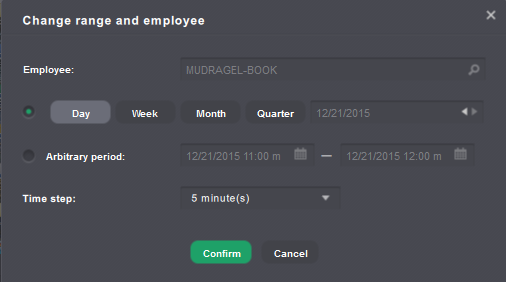
Parameters “employee”, “period”, “step” are required for video creating, hence they are set and changed in the pop-up window. After each change of at least one of these parameters, video from the server is updated.
When you create a tab, select the name of employee from the drop-down list. If you change the parameters of an existing tab, you can change the name of the employee. In this case tab will be renamed.
You can select one of the periods for video from the following variants:
- current day,
- current week,
- current month,
- current quarter.
Also you can switch between next and previous periods with arrow buttons and set custom period by choosing start and stop time within the accuracy of minute.
Attention!
When you choose custom period, program will enter start and end time equal to the time of tab creation.
Step value represents the period of time within which a frame is taken to create video. The less is the step value, the more detailed will be video, recorded from displays.
Attention!
If the frequency of video storage on the server is less than the one in the "History" section, the video will be displayed according to the settings of video storage frequency on the server.
For example, video is stored on the server at a rate of 1 frame per hour, the viewer will request the history in steps of 1 second, in this case the video in the viewer will be displayed at a rate of 1 frame per hour, and graphics of violations and running applications will be displayed at a rate of 1 second.
Select settings and click "Confirm". Downloading videos from server requires certain amount of time. During the video downloading there will appear video scroll bar.
While viewing video you can change playback speed. For this purpose drop-down panel with speed scale ![]() . is provided. Panel is opened/hidden by the button that shows current playback speed. Default speed is 1. Playback speed changes dynamically after each change of slide on scale
. is provided. Panel is opened/hidden by the button that shows current playback speed. Default speed is 1. Playback speed changes dynamically after each change of slide on scale ![]() .
.
You can save downloaded video of employee work. To save video, press the button ![]() below the “Change period” button. Specify the save path of the file in the downloading window. Video will be saved in webm format, which could be played with browser. If the browser does not start after the start of the playback, simply drag the file to the tab area of the browser.
below the “Change period” button. Specify the save path of the file in the downloading window. Video will be saved in webm format, which could be played with browser. If the browser does not start after the start of the playback, simply drag the file to the tab area of the browser.
If the employee has paused data collection in the self-monitoring interface, or no video of that employee is being recorded, or the viewer is prohibited from viewing the video of that employee, the corresponding informer will be displayed instead of the video.
You can also use keyboard shortcuts to work with video recordings.
Playback control
- Spacebar: Start or pause playback
Operating with multisession
- ↑ - switch to video playback in the top session
- ↓ - switch to video playback in the bottom session
Video rewind
- ← — rewind the video recording of history one step at a time
- → — fast forward the video recording of history one step at a time
- Ctrl + ← — rewind the video recording of history ten steps at a time
- Ctrl + → — fast forward the video recording of history ten steps at a time
Employee work analysis
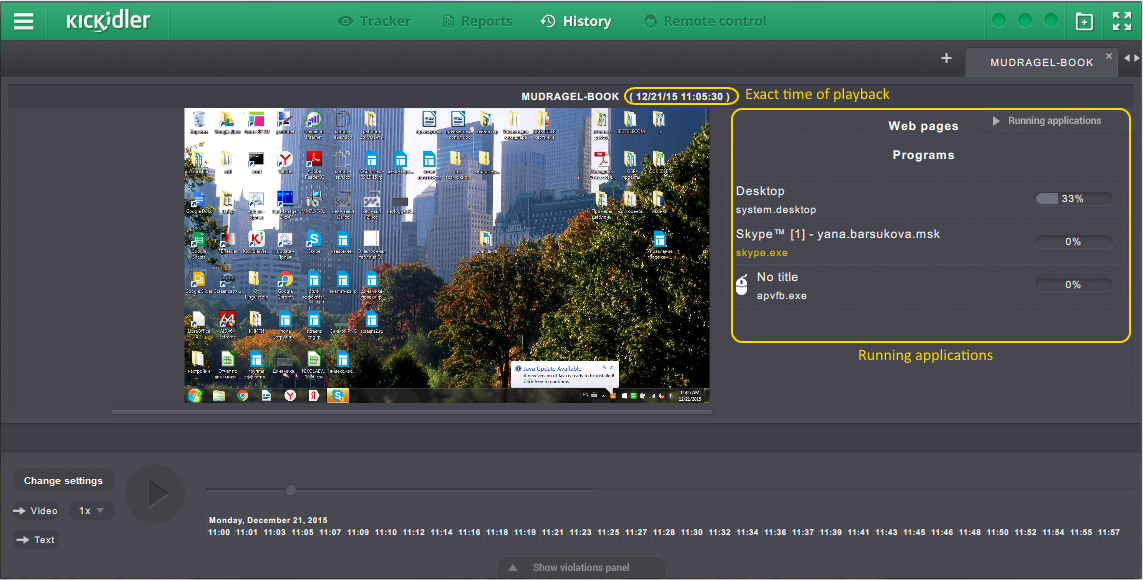
During video playback you can get the data regarding work of the employee which was analyzed by program. Information volume and its presentation are similar to information obtained while monitoring the employee in online mode.
Program will give full information regarding:
- employee activity,
- efficiency of work,
- violation triggering,
- running applications.
Interface has the following features for data representation:
- running programs panel,
- violations panel,
- keypress display string.
Running applications panel
Form and content of the panel are similar to the panel described before in this section. Panel is located to the right from display recordings. You can open/hide the panel with the button ![]() . Panel shows running programs and web pages at the moment of recording.
. Panel shows running programs and web pages at the moment of recording.
This panel also has the following features:
- application or web page efficiency grade,
- switch to the application history.
To grade application efficiency, click on the icon and select the grade. More details here.
To switch to the application history, click on the icon , select history view settings and click "Confirm".
Violations panel
The panel shows plots presented in “Violations” interface in online mode. Panel is located below the display recordings. You can open/hide the panel with the button ![]() .The panel shows employee activity histogram, efficiency of work in applications plot, violations triggering plot. Plots are built for each violation triggered during period of time, independent from the settings set in Quadrator cell for this employee. Plots are placed by degree of violation triggering in descending order. To view plots for all violations, use the scroll. You can select the necessary period in plots and browse to video playback in the “History" section.
.The panel shows employee activity histogram, efficiency of work in applications plot, violations triggering plot. Plots are built for each violation triggered during period of time, independent from the settings set in Quadrator cell for this employee. Plots are placed by degree of violation triggering in descending order. To view plots for all violations, use the scroll. You can select the necessary period in plots and browse to video playback in the “History" section.
Keypresses display string
Employee keypresses are displayed in the string under the video. In each moment of time the string indicates the typing status: gray color indicates that keypresses were executed yet, white color indicates that keypresses will be executed later.
There is a possibility to export the keypresses. For exporting you need to click the “Text” button, select file format, folder for export and file name. If it is necessary, you can upload file without system keypresses, i.e. uploaded file will have only characters and digits that were not deleted by Backspace key.
If the viewer is prohibited from viewing the keystrokes of said employee, the manipulation with keystroke running line in the section will be disabled and the export of keystrokes won't be available.
Audio Recording Feature
Overview
Kickidler now includes a feature that allows managers to record and monitor audio from employee devices. The feature gets activated when employees use their speakers and microphones, capturing audio that can be played back at a later time. Managers can access these recordings through the "History" section, with the option to download audio files at up to one second resolution.
1. Enabling Audio Recording
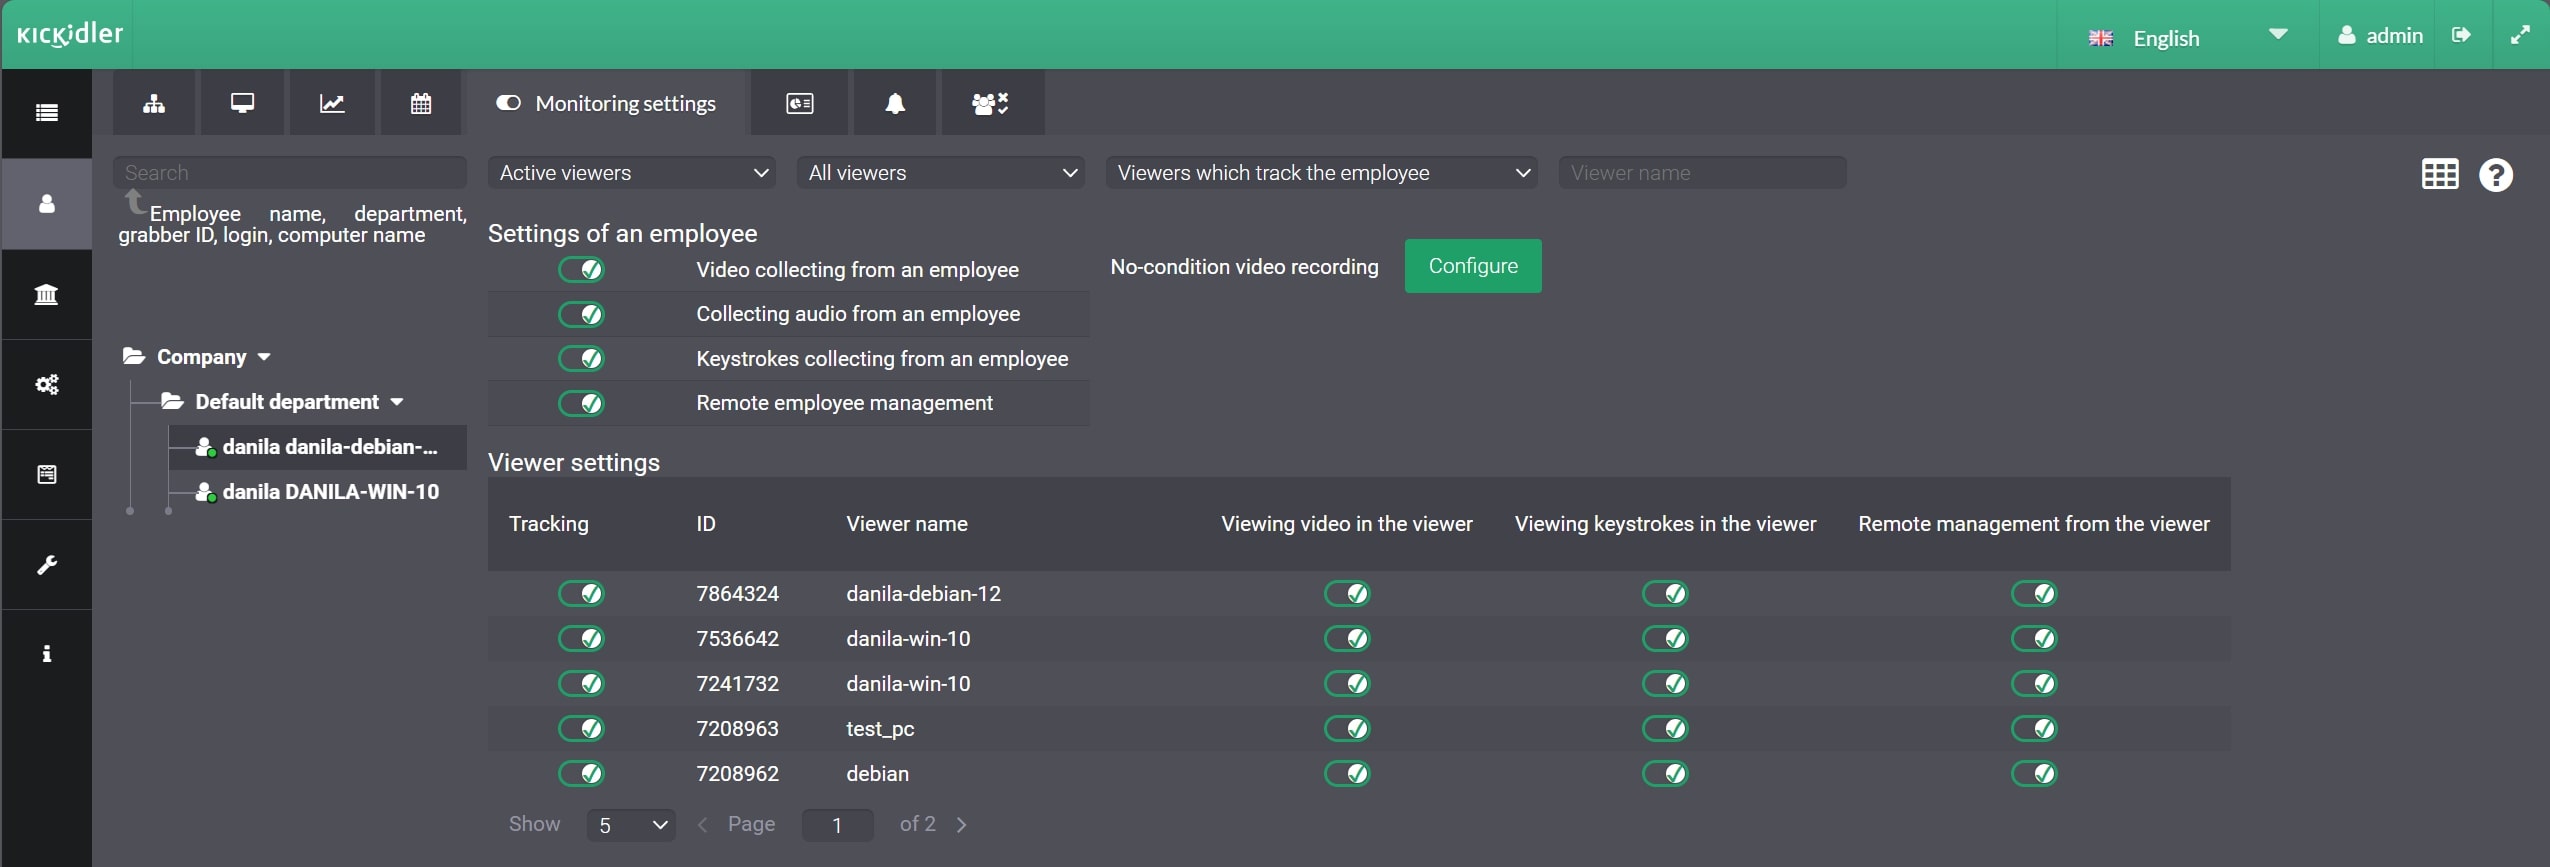
To begin recording audio from employee devices, you must first enable audio collection in the Central Server (CS) settings:
- Accessing the Central Server (CS) Interface:
Open the Kickidler CS interface and access the settings related to employee monitoring. - Selecting Employees:
Choose the employees or departments whose devices you want to record audio from. - Enabling Audio Recording:
In the employee settings section, make sure that the "Collect audio from employee" option is enabled. This will enable the software to start capturing audio when a microphone or speakers are used on an employee's device.
2. Monitoring and Listening to Audio in the Viewer
Once audio collection is enabled, you can monitor and listen to recorded audio using Kickidler’s Viewer:
- Accessing the Viewer:
Launch Kickidler’s Viewer and select the employee whose audio you want to listen to. - Real-time Monitoring:
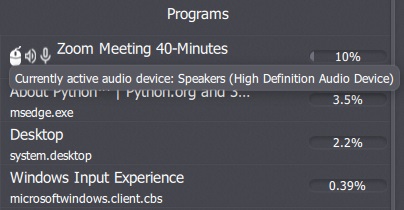
The Viewer displays real-time data about active audio devices. You can see which audio devices are in use, such as "Speakers (High Definition Audio Device)" or microphone, as well as the corresponding application that is using those devices (e.g., firefox.exe).
- Listening to Audio History:
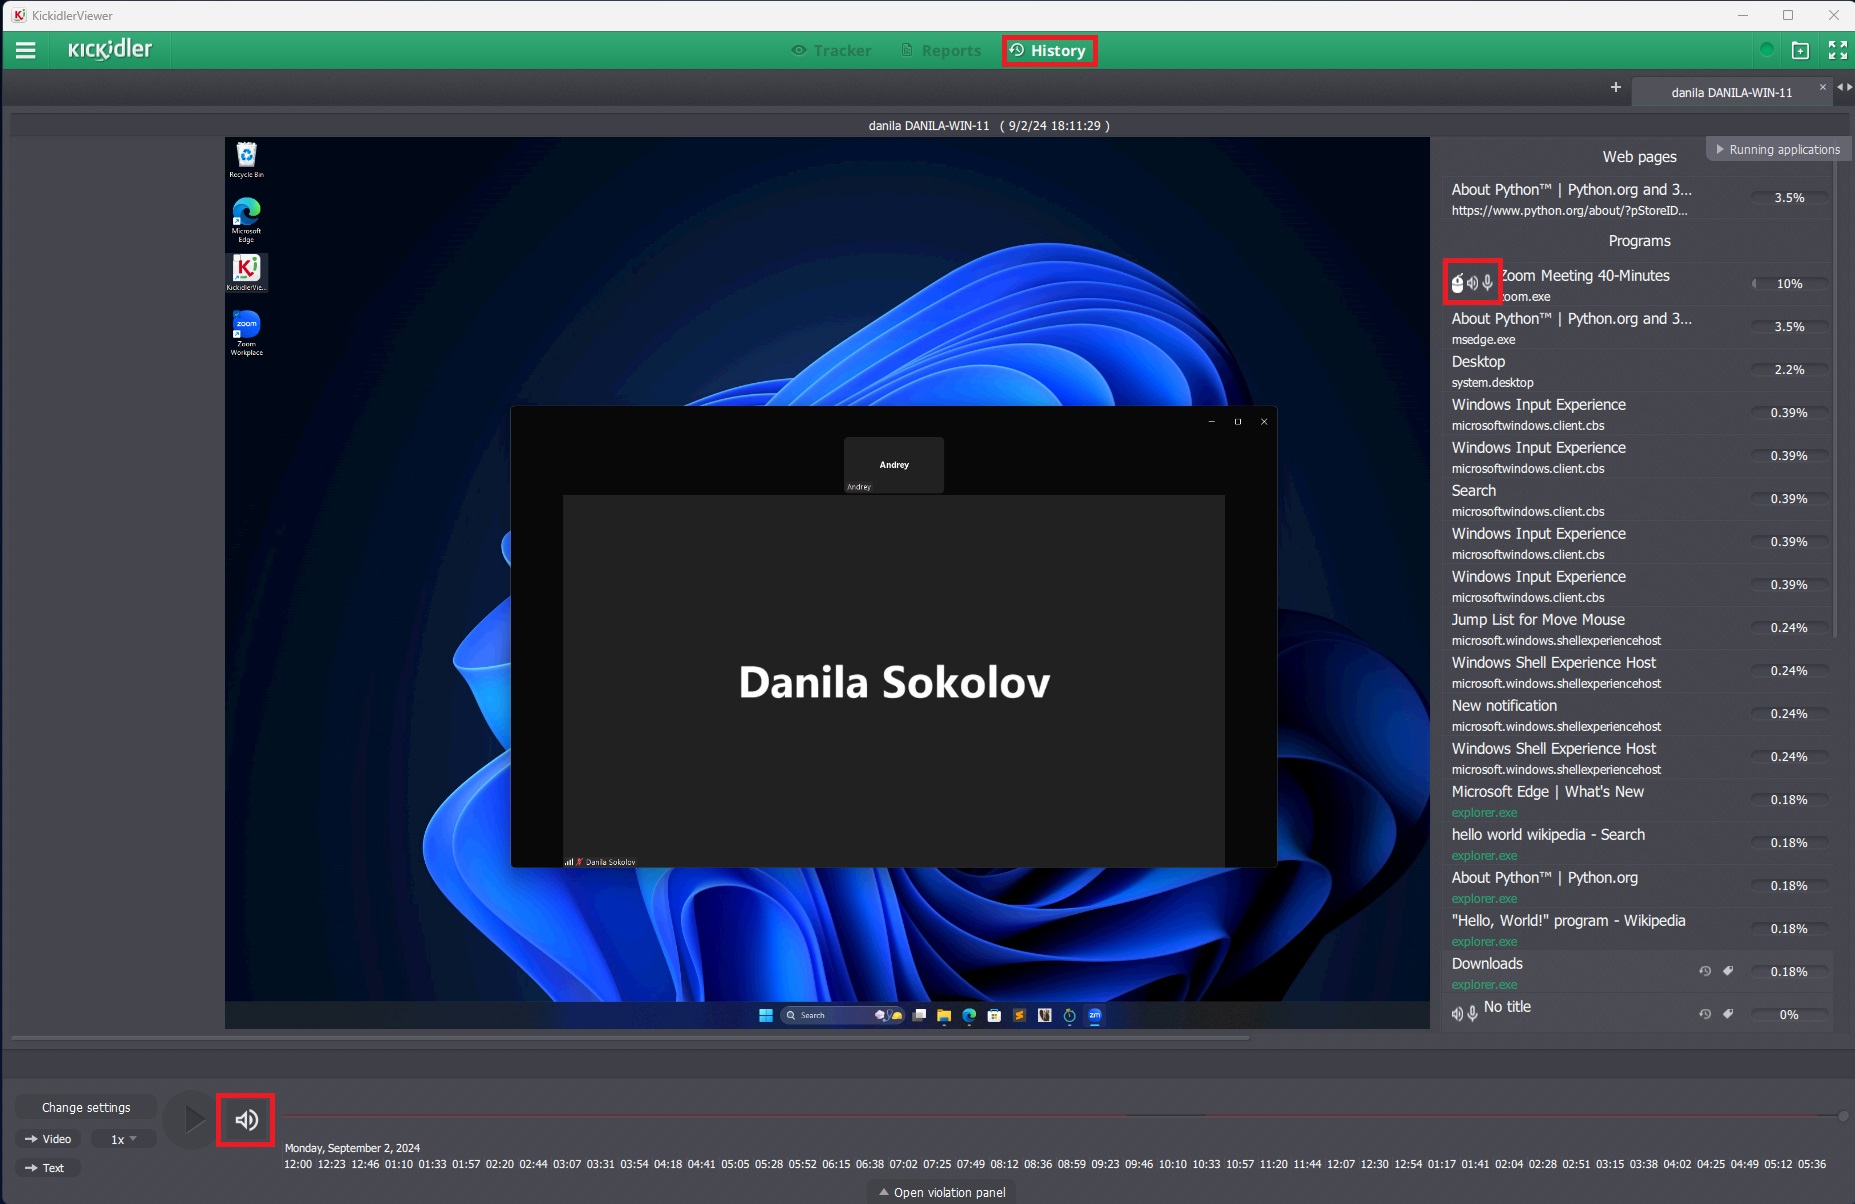
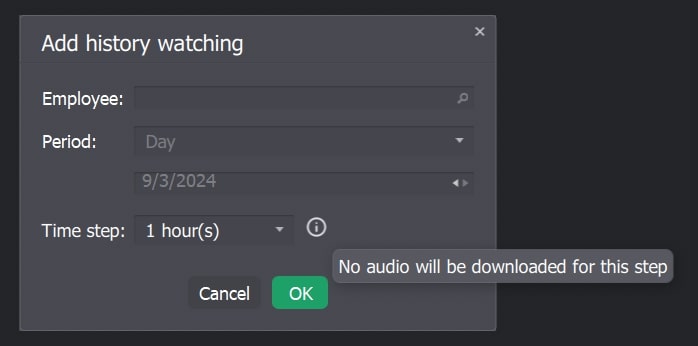
To listen to previously recorded audio, go to the "History" section in the Viewer. Here, you can load audio files for specific time intervals, in one-second increments, allowing you to analyze recorded sessions in detail. If you select a different step value, you will be notified that audio cannot be loaded.
- Playback Controls:
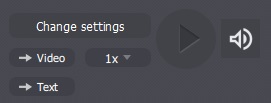
The Viewer offers basic playback controls such as play, pause and stop to easily navigate through audio recordings. The speaker icon turns audio playback on and off.
3. Understanding the Interface Icons
The interface uses certain icons to indicate audio recording and device usage status:
- Speaker icon: Indicates that the speakers are active and audio has been recorded.
- Microphone icon: Indicates that the microphone is in use.
These icons will be visible in the Viewer, providing a quick overview of audio activity.
![]()
Important
- Audio Step: Audio can only be played back in 1 second increments, audio cannot be listened to with a different value.
- Playback Speed: Audio recordings can only be played at 1x speed. No speed up or slow playback options are available.
- OS Support: At this time, the audio recording and playback feature only works with Windows operating system.
- The following steps are required to ensure the audio recording features works properly::
- Go to the "Control Panel"
- Find "Sound" via search or small icons
- Go to the microphone section
- Go to the device properties
- Go to the "Advanced" tab
- You should have additional (advanced) sound tools enabled
Conclusion
With its new audio recording feature, Kickidler delivers a comprehensive solution for monitoring employee performance and enforcing workplace rules. By following this guide, managers can effectively utilize the audio recording feature to better monitor and manage their teams.
 English
 Русский
 Português
 Español
 Հայերենով
 Türkçe
 Български
 中文
中文 ქართული
 Français

